When was the last time you allowed yourself to dream? Dream about what could be? Should be? Will be? Whether it’s only been a few hours since your last daydream or it has been too many years to count, today we are going to put those dreams on paper so we can begin working on making them a reality. Let’s start “EnVisioning”!
Many times things don’t become real for me until I commit them to paper. The act of transferring thoughts to documented ideas is life-giving. It helps clarify what was abstract and provides me with one more layer of accountability for accomplishing them.
Every year for the past 6 years I have faithfully created a vision board for the new year. It helps me get focused for the new year and begin visualizing what I want to achieve over the next 12 months. The process is incredibly spiritual while tapping into my creative side and activating the planner in me that is always more than ready to be released. Each year that I have set aside time to invest in this practice I’ve discovered new things about myself, found the courage to pursue goals that had only been dreams before and have seen God work in incredible ways in and through my life.
My annual vision board provides a road map for the year ahead. As the year progresses I consistently “check in” with my visual goal sheet to track progress, realign if needed and determine next steps. At the end of year as I take stock on what I’ve achieved, not everything gets checked off the list. Some things are works in progress, where I’ll continue making positive forward movement on them in the next year. Others may need to be retired or re-thought. I’m fine with all of that. I celebrate the successes, progress and even the misses. No matter what, I always end up in a better place at the end of the year than the beginning due to my focus on my goals.
So, let’s get into how to make a vision board so you can get started on visualizing and obtaining your dreams.
1. Start with prayer.
Perhaps the reason I enjoy this exercise so much is the freedom it provides. It is so liberating to dream and see how these dreams manifest themselves. The dreams that are scattered across my board aren’t my own. They aren’t ideas that just come to me. They are 100% inspired by God, conceived in me and birthed through his power.
Before even thinking about what I should focus on, I pray. Some years I’ll do a silent retreat, hours or days of silence, where I journal, sometimes fast, and press into his presence to hear from him. Other times I may get bits and pieces of the vision for the year ahead over a series of days or weeks. When he speaks, I record it. It may be general themes, such as healthy eating (think “Girl, you need to eat right.”) or may be very specific like “write that book”. Almost always it is confirmation of things he’s been speaking all along or that I’ve been sharing with him. In receiving the vision, I feel ownership and accountability because I’ve identified what he wants for me and know that my actions, powered by his grace, will drive the success.
2. Gather Your Supplies
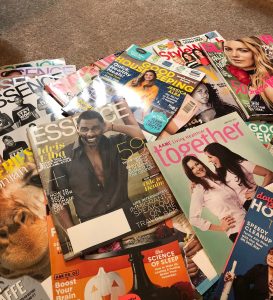
- Magazines: Grab some old magazines. If you don’t have any at home, ask neighbors and friends for their old ones. Or, buy a few from the supermarket. Don’t want to spend the money? Ask local businesses (your favorite salon, dentist office, your job) if they have old issues in their lobby that you can have. Overall, go for magazines that will likely have images related to your vision. Can you guess why Essence is on the top of this pile 😉 But also, don’t be surprised if you find just the right image or word in one of those free magazines that the local hospital or your alma mater mail out.
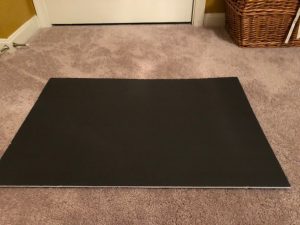
- Poster Board: Find a board you don’t mind staring at all year. Poster board works just fine. I do like mine to be a bit sturdier so I tend to buy the thicker, foam board. I’ve seen people also use large poster frames or even shadow boxes. It’s yours, so feel free to use what makes you happy.
- Art Supplies: Round up the basic art supplies such as glue, tape, scissors, ruler (if you care about straight lines – I don’t), markers, etc.
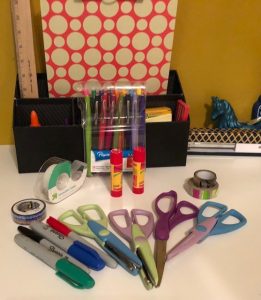
- Embellishments: Some ideas include scrapbook paper (I’m obsessed with that stuff), stickers (thank you Dollar Tree), glitter, decorative tape, ribbon – anything that you think would make it uniquely yours. This year I didn’t use much of any of these but I did cover my board with some cute wrapping paper I bought years ago from TJ Maxx to add a fun background.
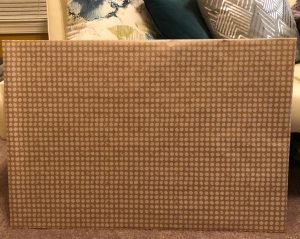
Isn’t this wrapping paper cute! Makes a great background.
3. Cut out your images and words.
This can take a while and there may be a temptation to overthink it. You’ve already prayed about this. Therefore, go with your first impression when it comes to words or images. If you have to look at it too long or rationalize it, may be better to bypass it. Yet, something may resonate with you deeply and not have been part of what you were initially searching for. That’s okay. Clip it out. Add it to the pile (we’ll go through the purging phase next). The main thing is to just locate images and words that you think you’d like to use.
For those of you that don’t like rules, you’re in luck! This is a highly creative exercise where you call the shots. I’ve found that each year my board is different. Also, I tend to be very focused on words and don’t end up with that many pictures. That’s okay. My board. My way.

4. Assemble your vision board.
This is where the purging comes in. I always seem to end up with more pictures than what I can fit on my board. There’s a little picking and choosing going on. “Do I really need 5 pictures of Idris this year?” No. I do not. But if one year I do, that’s okay too. Just determine for yourself the most compelling words and images that affirm the vision God has given you.
I don’t do very well with commitment. Therefore, I lay out my items, embellishments and all, on the board, play with placement, switch things out, trim corners, and let it breathe before one speck of glue touches those glossy cutouts. In fact, this year, I let it sit overnight and when I came back to it, I moved a lot around. But not everyone is like me. You may resist overthinking it and get to gluing right away. Whatever works.

Ta-da!!! My vision board is complete.
Once everything is glued down, hang your board in a prominent place where you will see it everyday. I typically hang mine above my desk in my home office. Hanging there, it is a daily reminder for me. I also take a picture and save it as my screensaver on my computer. Seeing my board daily not only motivates but also brings me joy. Its the hopeful anticipation of what God will do in and through me. That brings a smile to my face.
Final thought. You can make vision boards anytime, for any reason – not just at the beginning of the new year. Your vision board can focus on one specific area of your life (i.e. career, faith, fitness) and can be done at any time. For me, the most important thing is to give life to your dreams by putting your God-given vision(s) on paper. Once you’ve done that, we can talk about “igniting your vision” and setting up realistic plans for achieving your goals. Stay tuned for that post in the coming days.
In the meantime, start EnVisioning!